Estos días se esta poniendo bastante de moda en mi zona lo de hacer pulseras de macramé. Yo empecé hace bastante poco a hacerlas, creía que eran muy complicadas, pero una vez que te pones te das cuenta de que es bastante fácil. En esta 1ª entrada dedicada al macramé os voy a enseñar los cuatro nudos que se utilizan: izquierda, derecha, izquierda-derecha y derecha-izquierda.
Macramé bracelets are becomig really popular in my area. I first thought that they were very difficult but it's actually quite easy. Today I'm going to teach you the the four basic knots: backward, forward, backward-forward and froward-backward.
Macramé bracelets are becomig really popular in my area. I first thought that they were very difficult but it's actually quite easy. Today I'm going to teach you the the four basic knots: backward, forward, backward-forward and froward-backward.
Lo primero que hay que saber para hacer macramé es que hay que hacer dos nudos con el mismo hilo para terminar el nudo. Según la dirección en que lo hagas el hilo cambiará de posición o se quedará donde está. Eso ahora suena un poco raro pero espero que se entienda mejor cuando explique cada nudo concretamente.
The first thing you have to know is that you always have to do two knots with the same thread to finish the real knot. depending on how you make them the thread will change it's position or stay where it was. Now it sounds weird but you'll understand it when I explain every knot.
The first thing you have to know is that you always have to do two knots with the same thread to finish the real knot. depending on how you make them the thread will change it's position or stay where it was. Now it sounds weird but you'll understand it when I explain every knot.
En todos los casos vamos a empezar con estos hilos:
We start with these two threads:
We start with these two threads:
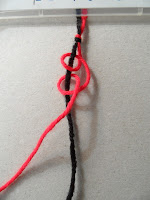
El nudo izquierda lo que hace, como dice su nombre, es pasar un hilo que está a la derecha para la izquierda. Para hacerlo cogemos el hilo que queremos pasar (en este caso el rojo) y lo ponemos encima del otro hilo (el negro) en forma de cuatro invertido. Pasamos el hilo por el agujero, apretamos el nudo y volvemos hacer lo mismo.
With the backward knot we change the porition of the thread that is at the left. We take the thread (in this case the red one) put it over the other making a inverted four shape. We pass the thread through the hole, tight it and make the same thing again to complete the knot.
Si lo aflojamos queda algo como esto:
If we don't tight the knot, it will look like this:
If we don't tight the knot, it will look like this:
De esta forma el hilo rojo cambia de posición.
Now you see how the red thread changes its position.
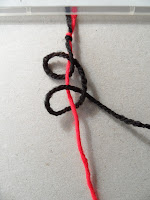
El nudo derecha es justo lo contrario que el izquierda, pasa un hilo que esta a la izquierda para la derecha. Para esto hay que coger el hilo que se quiere pasar y colocarlo encima del otro con forma de cuatro. Se hace el nudo y se repite. Sería como hacer algo así:
The forward knot is the opposite thing of the backward, we pass a thread tht is at the left to the right. You have to take the thread that is at the left, put it over the other making a four shape and pass it trough the hole. Like the other, you have to repeat this to complete the knot.
The forward knot is the opposite thing of the backward, we pass a thread tht is at the left to the right. You have to take the thread that is at the left, put it over the other making a four shape and pass it trough the hole. Like the other, you have to repeat this to complete the knot.
Ahora es el negro el que está donde el rojo.
Now the black has changed it's position.
Now the black has changed it's position.
Los nudos izquierda-derecha y derecha-izquierda sería mezclar los dos anteriores, y sirven para hacer el nudo pero dejar los hilos en la posición original.
Bueno, esta entrada ha sido bastante larga y he intentado explicarlo lo mejor que puedo. Si aún así tienes dudas dimelo e intentaré solucionarlas.
En la próxima entrada subiré como hacer algunas pulseras muy fáciles para que podáis ir practicando ;)


No hay comentarios:
Publicar un comentario